I migrated the template to my own project, what now ?
If you choose to migrate the the template to another project there are 3 things you will need to do:
1- Set the project game instance to the BR_GameInstance in order to that go to Edit >> Project settings and use the search bar to look for game instance, then set the game instance to BR_GameInstance

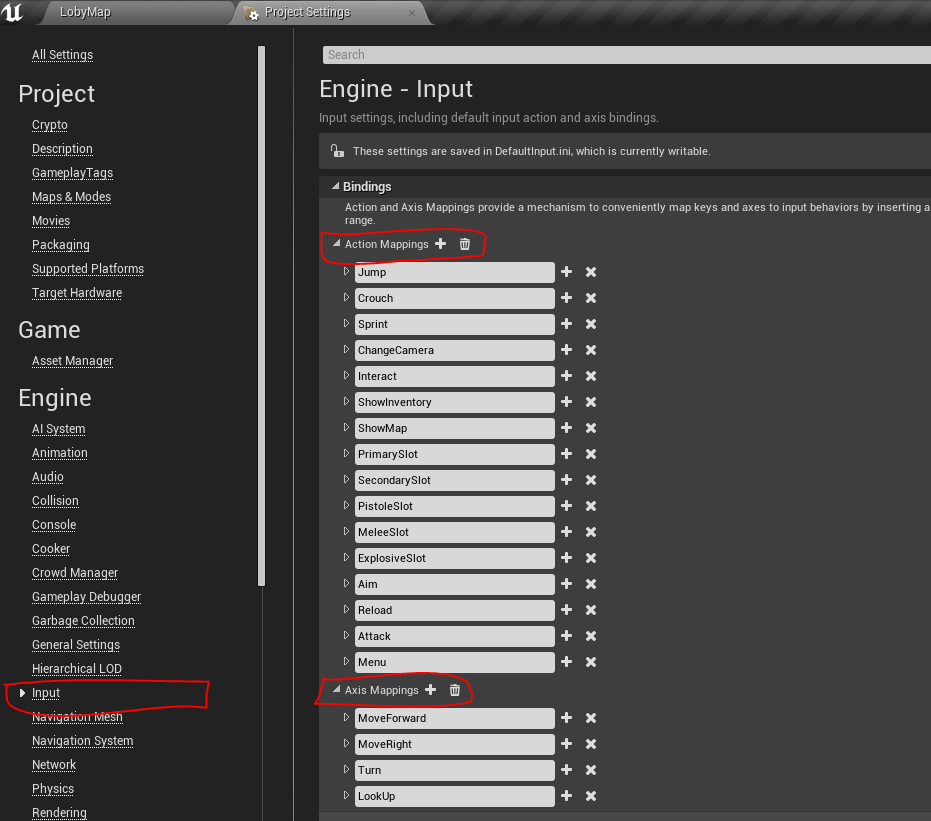
2- Because it's a different project than the one used to create the template you will have different input names for moving forward etc you will get warnings and some inputs will not work like aiming etc, to solve this issue you will need to add the input names used in the template in your input settings.
Go to Edit >> Project settings >> Input and enter these inputs with the exact names, feel free to assign whatever key you'd like to use in each input.
3- Finally you will need to create 4 collision channels, to do that go to Edit >> Project settings and search for channel, in the Engine - collision section add 2 object channels by clicking on New object channel, the names should be Bullet and pickup both block.
Add 2 trace channels (pickupChannel, and explosion) they both block.

Now let's make sure these collision channels are being used properly.
Go to 4-World/WorldItems and open the MainPickupClass then select the BoxCollison and make sure it has this exact same collision

Next go to 2-Characters/BR_Character and make sure the Capsule Component and the mesh have these collision settings

Go to 4-World/WorldItems/Projectile and open the MainBulletClass then select the Sphere and make sure it has this same collision (Object type = Bullet)

This might not be necessary but just in case you had problems with picking up items then open the BR_Character and look for LookForPickups and InteractWithWorld functions make sure the trace channel used in the LineTraceByChannel node is set to pickupChannel
Change and spawn with lobby characters
To be able to spawn with lobby characters first in the BR_GameInstance make sure you enable this setting, and indicate your lobby characters and main characters.You can checkout the default values of those 2 arrays, the lobby characters are dummy characters that don't have any heavy logic their purpose is visual only, whereas the Maincharcaters array contains the actual playable character class reference that will be spawned when the game starts.

There are 6 characters configurations, where the first index in the lobby array is equivalent to the first index in MainCharacters array. You can simply open the 6 characters and change their appearance, if you need more characters you can simply duplicate the child characters. (Right click > duplicate or Ctrl+W)
How to change character mesh
I have my own map, how can I use it ?
This video has everything you need about setting up a new map
Using your own map is very easy, go ahead and load your map by double clicking on it.
Go to BattleRoyaleTemplate/4-World inside of this folder you will find 2 player starts, one is called BRStartingZone_PlayerStart this player start is going to be used by the game mode to spawn players in the starting zone where they prepare/wait for the game to start, so go ahead and place one or more in your starting area.
The next step depends on what game mode you'd like to use, you'll find out in the template that we have 2 maps, one puts players on a plane and in the other map players are teleported to the battle area instead.
1- Teleporting players to the battle area (No plane used)
The game mode will need the other player start to do so, go to BattleRoyaleTemplate/4-World and now place one ore more BRArena_PlayerStart where you want them to be teleported when the countdown ends.
At this point you're almost done, the last most important thing is to set the game mode and player controller etc in the World settings panel, if you can't see it go to Window >> Word settings. In the world settings panel select the Game mode override to BR_GameMode and set the Player controller to BR_PlayerController, Game state to BR_GameState, player state to Bp_PlayerState.
Default pawn should be set to None because we're spawning the character ourselves in the game mode, however in 4.25+ you can set the default pawn and it will be used to spawn your character unless if you're using the lobby character.
Default pawn should be set to None because we're spawning the character ourselves in the game mode, however in 4.25+ you can set the default pawn and it will be used to spawn your character unless if you're using the lobby character.

2- Using a plane to take players and fly over the map to the battle area where they can jump off the plane.
If you went with the first option (Teleporting players) please ignore this part.
Let's start by the world settings:
The most important thing is to set the game mode and player controller etc in the World settings panel, if you can't see it go to Window >> Word settings. In the world settings panel select the Game mode override to BRPlane_GameMode set the Player controller to BR_PlayerController, Game state to BR_GameState, player state to Bp_PlayerState.Default pawn should be set to None because we're spawning the character ourselves in the game mode, however in 4.25+ you can set the default pawn and it will be used to spawn your character unless if you're using the lobby character.
The most important thing is to set the game mode and player controller etc in the World settings panel, if you can't see it go to Window >> Word settings. In the world settings panel select the Game mode override to BRPlane_GameMode set the Player controller to BR_PlayerController, Game state to BR_GameState, player state to Bp_PlayerState.Default pawn should be set to None because we're spawning the character ourselves in the game mode, however in 4.25+ you can set the default pawn and it will be used to spawn your character unless if you're using the lobby character.

Go to BattleRoyaleTemplate/1-Maps/MapWithAirPlane/PlaneBP/CheckpointBP inside this folder you can see 2 actors go ahead and place 1 or more PlaneSpawnPoint where you'd like the plane to spawn, if you place more than 1 the game will select one of them at random, then place 1 or more FinalCheckpoint where you'd like the plane to go (make sure it's inside the map and close to the edge of it, this is considered the final checkpoint and players will be forced to jump off when the plane is almost near it)
Note: Make sure all these actors you just placed have the same Z location value if you want the plane to keep the same height across the flight.
Here's an example:

Every map is different so you will need to set some simple settings inside the plane itself, inside BattleRoyaleTemplate/1-Maps/MapWithAirPlane/PlaneBP open up the BR_AirPlane blueprint, you'll need to change the variable DistanceToDestinationToAllowJump value this is basically the distance between the plane and the final checkpoint location where players will be allowed to jump. The players will be forced to jump off once the distance between the plane and the final checkpoint is less than 2000.
How do I change the minimap/Overview map background texture ?
The first thing you'll need is a texture of your map, if you don't have one go to
5-Minimap/MinimapComponent/Actors/MapCapture2D there you'll find a MapCapture2D blueprint, we'll use it to capture an orthographic image of our map (make sure your map is loaded).
Step 1: Place the MapCapture2D in your level and set its location to (X=0,Y=0,Z=25000) basically we want it to be in the center so make sure X and Y are 0 and Z can be 25000 or higher.
In the same folder there's a MapCaptureTopView render target this is what the MapCapture2D is using to display whatever it is capturing, hover your mouse over MapCaptureTopView to force it to update.
Step 2: While selection the MapCapture2D in the level go to the details panel and look for the Ortho Width property and change the value until the entire map can be seen in the MapCaptureTopView render target (again hover your cursor over the render target whenever you change the Ortho Width to force it to update) keep Increasing/decreasing the value until you get something like this:

As you can see the map is entirely captured (try to get something similar), in my map I used 500 000 as the Ortho Width to get that result so remember the Ortho Width you used because it will be needed in the minimap settings (Ortho Width is essentially the width in world units of the area we want to capture in the map)
Step 3: Right click on the MapCaptureToView render target and select Create Static Texture this will be the texture we will use as the minimap/Overview background texture. (Rename it something you can remember I renamed mine 500KUnits_Minimap)
IMPORTANT: As soon as you create the static texture REMOVE the MapCapture2D from your level because it's very demanding and you will get a big performance decrease.
Step 4: Go to 3-WidgetsBP/Minimap and open the MinimapWidget, select the MinimapComponent and in the Details panel change the Map Texture to the static texture we just created (mine is 500KUnits_Minimap) and set the Map Length In Textute to the Ortho Width you used in the MapCapture2D (I used 500 000). Feel free to change the other settings (Zoom, border etc)
Here are my settings:

Now open the OverviewMap widget and do same thing for the settings. (Mainly the Map Texture and Map Length In Texture)

Step 5: Go to 0-MainClasses folder and open the BRPlane_GameMode in the Post login event remove this event call shown below (You can use this event to change the minimap/overview settings in blueprint) but since we just changed them manually in Step 4 we don't need to call that event anymore.
 (Feel free to use this event to change the minimap settings, don't forget to change struct values)

How to add new pickups
In this video I'll show you how to add a new shotgun weapon.
All the weapons I have in the template use the "Weapon" socket to attach (equip) a weapon mesh, but the mesh in the video has a different rotation therefore we need to either edit the mesh in a external program to match the same rotation or make a new socket for that specific mesh or meshes that have that rotation.
How to change the Zone settings
First you need to have the ZoneBP placed in your map it can be found in 4-World/Zone after that you need to select the ZoneBP you placed in the map and change the settings starting by the InitialScale and the ZScale then add as many steps as necessary, each step can have different speed and damage, you can look the 2 map examples to see how I setup those steps.
